Hello to everyone that has stumbled onto my blog!
I have recently moved my blog to http://madebypensuke.wordpress.com
I decided to move because I was finding it frustrating to change the layout of my blog and I wasn't sure if all these wonderful page views I was getting were bots or people actually checking out some of my projects.
If you are interested in seeing more craft, food and general hobby posts, please come visit me at my new home.
My axololt , Sebastian, giving you a big smile enticing you to visit us =)
Chocolate cupcakes with toasted marshmallow frosting
Tuesday 3 June 2014

I was closing the many tabs I had open on my tablet and saw that I had searched for a chocolate cupcake and toasted marshmallow frosting recipe. It must have been after I watched an episode of nerdy nummies or came across it on Pinterest. Whatever it was it had me thinking of cupcakes and that marshmallow frosting for two days!
I wasn't too keen on the recipe for the cupcakes so I only used the frosting part of the recipe and adapted a mississippi mudcake recipe I had from the hummingbird bakery book.
We reduced a few things and changed the quantities a little. They still came out very rich so if you're after a lighter chocolate cupcake this is not the recipe. I might try a lighter one next but I do love me some mudcake =).
This recipe makes about 24 large cupcakes or 50 mini cupcakes. If you make a smaller batch remember to reduce the frosting quantities too.
Chocolate cupcakes
165g unsalted butter
400g Caster sugar
2 eggs
300g plain flour
95g coco powder
1.5tsp bicarbonate of soda
pinch of salt
250ml of buttermilk
1/2 tsp vanilla extract
250ml of boiling water
Method:
- Preheat oven to 170 degrees C
- Cream butter and sugar together until light and fluffy. Add the eggs one at a time, mixing well and scraping down the sides of the bowl after each egg.
- In another bowl, sift the flour, coco powder, bicarbonate of soda and salt together. Mix buttermilk and vanilla in a jug. Add the dry ingredients to the creamed butter and sugar in three additions, alternating wit the buttermilk mixture. Mix well on medium speed. Slowly add the boiling water, mixing until combined.
- Line a cupcake tin (or mini cupcake tin) and fill each one to the top or about a mm below. They rise a bit and the mini cupcakes don't sink very much so I like to fill them up and get a nice round top.
- Bake for about 15 mins or until a skewer comes out clean.
- Leave to cool before frosting.

Marshmallow frosting
4 large egg whites at room temperature
1 cups granulated sugar
1/4 tsp cream of tartar
Pinch of fine salt
1 tsp vanilla extract
Method:
- Prepare a bain marie.
- Whisk together egg whites, sugar, cream of tartar and salt. Heat mixture on the bain marie until the sugar has dissolved.
- Take off the heat and beat on medium speed for 1 minute. Then whisk on high until stiff peaks form.
- Whisk in vanilla extract.
- Transfer to a piping bag with a star tip and pipe generously onto each cupcake.
- Using a blowtorch toast the marshmallow frosting, being careful not to burn them.
Serve immediately or store in an airtight container for 3 hrs .
Edit: We had left overs that we kept out at room temperature for a few days and still tasted great! Make sure you pipe the frosting on all the cupcakes and toast them before putting them away or you'll need to rewhip the frosting.


Enjoy
Thanks for stopping by!
More Macarons: Pandan and Coconut flavour and Black Sesame
Saturday 31 May 2014
A couple of weeks ago we had a birthday gathering for K's grandma. I've been meaning to try making pandan and coconut macarons for a while now but after the blitz of making heaps of macaroons last year we where a little over eating macarons.
I did a search online and came across so many variations! There was one that just used store bought kaya as the filling, I think that would have tasted great but would've been too sweet for me after having one. So I settled on a recipe from cakeisthenewblack. This recipe didn't use pandan leaves just the extract, I haven't been able to find any pandan leaves in the shops, coconut milk and not too much dessicated coconut which I'm not a fan of but was contemplating adding for the texture.
As I was rummaging around my pantry for my pandan extract I came across a bag of black sesame and decided to try making some black sesame ganache too. Black sesame is one of my favourite flavours!
We used the same macaron recipe as on my previous post simple macarons.
We added pandan extract to both the shells and the ganache to make it extra pandan-y.

Neat rows of shells ready for baking. We added some of the black sesame to the shell to see if they'd look good. J said they looked like ants, but they did end up looking quite good.

Ganache recipes
Pandan and coconut
50g coconut milk
pandan extract (I added 3-3.5tsp )
90g white chocolate ( I used the nestle white chocolate melts)
35g unsalted butter, softened
5g dessicated coconut
Black Sesame
50g coconut milk
80g white chocolate
2tbsp of black sesame
- Melt the white chocolate in the microwave (or a bain marie)
- Add the butter and mix well
- Slowly add the coconut milk.
- Then add the rest of the ingredients and mix throughly.
- leave in the fridge to chill and set.


Yummy macarons ready for the party! And of course mini macarons for "taste testing" =)
Enjoy! and thanks for stopping by!

Bridge St Garage
Wednesday 14 May 2014

The place was packed out on a Friday night. The front of the restaurant was deck out with high tables and tall bar stools giving it more of a bar feeling and closer to the back of the restaurant were booths and normal height tables.

 |
| Garage Buffalo Wings ($15) |
We also also ordered the guacamole with corn chips ($13.50) and the lamb lollipops ($22). The guacamole was nice but nothing really special. The lamb lollipops were really nice, cooked just right, it was succulent and went really well with the chimichurri sauce. Not sure if it really worth the $22 but worth a try if you really love lamb.
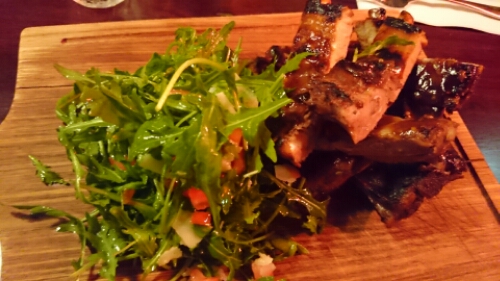 |
| Sticky pork ribs ($36) |
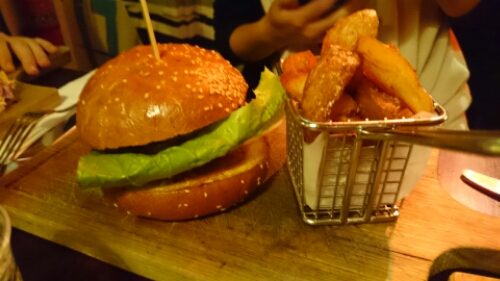 |
| Gaucho Burger ($19.50) |
 |
| New York cut steak ($32) |
 |
| Sweet potato chips ($9) |
 |
| Onion rings ($8) |
 |
| Deep-fried southern crispy chicken ($22) |
 |
| Trio of ice cream ($9) |
The trio of ice cream flavours were vanilla strawberry and mango. That mango ice cream was the best! It tasted like a weiss bar.
 |
| New York cheesecake ($12) |
 |
| American apple pie ($12) |
 |
| Garage brownie ($10) |
And the best for last the garage brownie. This was my favourite dessert. The brownie was warm and chocolatey with just the right amount of nuts. The rhubarb ice cream was really light and complimented the chocolate really well.


Bridge St Garage
17-19 Bridge st, Sydney
(02) 9251 9392
Visited May 2014

Baby Aviator hat
Saturday 3 May 2014
Lately I've been seeing a lot of cute baby beanies on Pinterest. I'm really loving the baby aviators recently and since my friends have just had a baby boy, I thought it was the perfect opportunity to make one!
I did a few searches online and came across this pattern from Sticky little fingers. I love the little goggles but I wanted the flap look :)
So here is my version with a few modifications.
I used a 4.5mm crochet hook. Brown yarn is 85% wool, 10% acrylic and 5% viscose blend yarn. Cream yarn is 100% acrylic.
 |
| Aviator hat on my little panda model. |
 |
| Side view |
 |
| Baby and happy daddy hanging out |
It was great visiting the new bubba!
Crochet Hoot
Tuesday 15 April 2014
Giggle and Hoot as become such a popular kids segment. I always seem to see some sort of merchandising around. I suppose it doesn't help that I walk past the ABC shop often and I visit my nieces and nephews generally in the afternoon/ evening when its on.
One of our friends recently had a Hoot themed birthday party for their one year old so I found a hoot pattern online. I did a search through a few sites but they all seemed to lead back to the one pattern. Thanks to Six little mice for providing this free hoot pattern. As always I changed a little of the pattern so it would look the way i wanted it to.
I didn't take photos of when I finished each piece but this photo below is after I sewed on each of the appendages but before putting on the face. I sewed the little heart on by doing the black lines directly onto the body but I think it would have looked a better if the heart was a little more to the right. Next time I'll tack it on first and make sure its in the right place. (Same goes with the Eyes!)

I'm a bit of a tight crocheter so when I was closing up the head, in my opinion it looked a bit strange so I'll be adding in a few extra rows if I make another Hoot.

Heres the finished Hoot! He ended up being around 15cm tall.
I made up the beak as I went along so I don't have the pattern for it but if someone really wants it then leave me a comment and I'll try to duplicate what I did and write it up.
He was really fun to make. Thanks for stopping by!
Subscribe to:
Posts (Atom)


